My First Photo Book (2021)
28th June 2021
Producing a printed photo book had been on my ‘to-do’ list for a long time. Both a daughter and an adult granddaughter had gifted us fine examples, based on their unusual travel tours to Africa and Australasia. As a keen photographer, I needed to catch up with my own project. Their examples were based on specific subjects; a student’s gap-year in one case, and research for a family history in the other. What would be a suitable topic for me?
Initially, I had intended bringing together some of the best examples of my published work. I even started picture selection. However, I soon realized that I faced a difficult challenge identifying a coherent theme. Furthermore, I was rather overwhelmed by choice, having produced over 200 illustrated features of wood-craft and other creative people, and a similar number broadly based on plants and gardens, businesses and travel. With much of my available picture stock being film-based, I faced a daunting amount of film and print scanning in order to produce uploadable digital files. By the time I reached that conclusion, the count-down had begun. Having received a birthday gift to fund my first photo book, I followed a more experienced colleague’s advice, I bought ‘credit’ at a much reduced price. It pays to wait until offers are made at slack times. Buying credit allows you to purchase a book for completion within an agreed time limit.
So, with the clock already ticking and my first plan shelved, there was an urgent need for a focused mind.
A Lightbulb Moment
It was during this period of uncertainty, when my ambitious project had frustratingly turned ‘pear-shaped’, that fortune played its hand, and I experienced my ‘lightbulb’ moment. During lockdown, I learned about the educational value of webinars. That is another topic. However, several of these webinars were sponsored by the RPS (Royal Photographic Society). As a member of the specialist Digital Imaging Group, I was alerted to forthcoming online events. (Non-members of the society were also welcomed after payment of a very small fee). Speakers from worldwide represented many disciplines and genres. One such webinar featured Brooks Jensen, an American fine-art photographer and publisher of a highly regarded journal called Lenswork. His topic for the RPS webinar was: ‘Those Who Inspire Me (and Why)’ and his presentation reached several hundred viewers worldwide. The famous American author Ernest Hemingway was one of his choices.
Ernest Hemingway had a knack for succinct storytelling. Allegedly challenged to tell a story in six words, this is what he created: “For Sale. Child’s shoes. Never worn”. These six words were very sad and soberly thought-provoking.
Brooks Jensen used this unconfirmed story to illustrate how an idea was born for his journal. He cleverly adapted this minimal formula and launched a request for readers to contribute sets of six pictures which told a story (Seeing in Sixes). It was just the idea I needed, to kick-start my tardy photo book project.
A New Beginning
With a new presentational formula in mind, I decided to assemble groups of pictures which told a story, or embodied a theme, in two to four pages each. In several cases, such constraint called for very strict editing. Auto-biographical themes emerged and, eventually, selected memories were presented in seven chapters, viz. Family; Homes & Gardens; Pets; Projects; Travel; Steam; and Humour. As the book was intended primarily for family members, in three generations, this breakdown provided plenty of interest and amusement. On another day, I might have settled for a different grouping, such is the diversity of my picture catalogue. Fortunately, I was able to extend my credit for a token fee, which was acceptable for a first major book project.
Judging by the reception to the copies produced and presented as gifts, it has been highly successful and will serve as a valuable family reference book in the future. So what lessons did I learn in compiling my first photo book?
The Process
Based on the experiences of family and friends, I chose Photobox as my supplier. I purchased an A4 standard landscape book with up to 100 pages. Initial prices appear monstrously high; but I waited until one of several generous offers were made. Patience was rewarded if you allow sufficient time for your project.
Pictures were selected, processed and uploaded to Photobox. I used Lightroom to assemble my selected pictures in seven named ‘collections’, plus one for covers and end-papers. There they resided until they were allocated to blank pages.
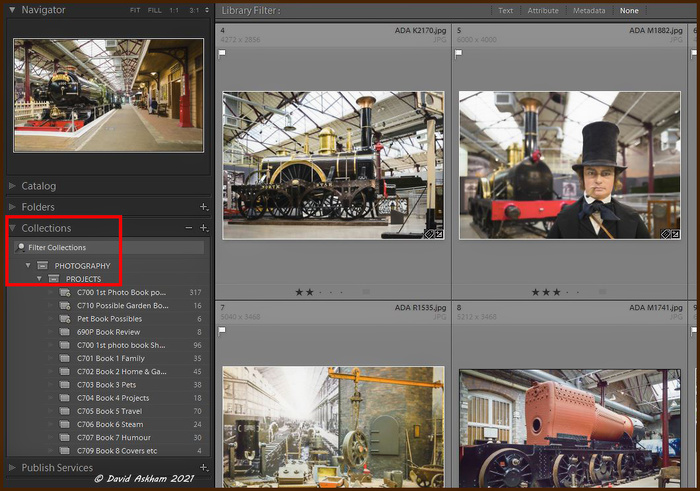
Pre-planning saves a lot of time. I used a series of flat-plans in a blank note-book to sketch my initial allocations of pictures. Your Photobox account shows work in progress, starting with empty pages. Photobox offers a quick and easy way of decanting pictures from smart-phones and automatically allocating pictures to pages. However, that was not what I wanted. I uploaded pictures, chapter by chapter, so that each could be designed in turn. In Lightroom, I allocated a titled collection for each chapter. (See illustration)
For each pair of facing pages, I tried to allocate a striking picture for one page, while the opposite page carried two, three, four or even up to eight pictures if necessary. Many two-page spreads contained three or four pictures in total, thus giving certain subjects greater emphasis. The smallest pictures tended to be copies of historic prints, which only existed in small sizes. However, those old pictures were of considerable interest to younger generations, who were quick to pick our facial similarities. In all cases, I aimed for pleasing visual impact, a feature quickly picked up by family viewers.
The software used by Photobox is simple, but not straight-forward to use. Unfortunately, I felt like a Beta-tester when seeking help, only to find that newer versions of the software did not yet have accurate help in the menu. I found this rather frustrating, and queueing for ‘Chat help’ led to unpredictable dialects and slow interpretation of evolving instructions. Amended ‘help’ was not available online at the time of my compilation.
Although there were several text options, I could not tabulate my ‘Contents’ page. And, despite pages being numbered online, page numbers were not printed, nor could they be printed. So my Content's pagination was a waste of time. The problem was partly overcome by allocating a different page background colour for each chapter. This solution was appreciated by family members when viewing the book.
One excellent feature of the software was its ability to shuffle a selection of pictures until you found an arrangement to your liking. This was huge compensation for my earlier frustration.
Lessons Learned
1. Decide on your subject before you order your book. I had to buy extra credit to compensate for my change of focus.
2. Set up a named picture folder on your computer or a set of Collections in Lightroom, to contain your short-listed picture sets. I find the latter invaluable with all of my projects, because it does not duplicate picture stock. This step saves researching your picture library repeatedly.
3. Make sure your picture files are sufficiently large for your intended publication size.
4. Give some thought to graphics display so that you obtain a good, clear presentation of images and information. If in doubt, aim for simplicity.
5. Draft your captions and other explanatory text before you upload pictures. I did it using a word processor on my desktop computer. Research into historic pictures takes a surprising amount of time. Don’t waste your credit time on this time-consuming chore. (Captions and supporting information are important, so don’t skip this task. Try and anticipate the Who? When? Where? What? and Why? questions which younger readers are bound to ask when you are not around to help them)
6. For your first book, be satisfied with the basic set of pages included in the starting price. One hundred pages was far too ambitious for my kind of project.
Conclusions
While there was a steep learning curve, I was well-pleased with my first photo-book which contained around 265 photographs, many full-page reproductions. While the unit cost was higher than I intended, largely due to over-running preparation time, upgrading paper quality and more pages than an average first book. In the end, I did have a high-quality, full colour, 100 page hard-back book which has been very well-received. and deemed to be a valuable visual and factual autobiographical legacy.
Uncosted are the very many hours of time spent on picture selection and preparation, research, planning, design and writing, all of which was filled with interest and nostalgia.
Pressure is building on me to continue producing some more books. Time will tell!
Please share with me your experiences of producing photo books. One never stops learning.
(All text and photographs are copyright of David Askham 2021 and must not be reproduced without his permission).
Initially, I had intended bringing together some of the best examples of my published work. I even started picture selection. However, I soon realized that I faced a difficult challenge identifying a coherent theme. Furthermore, I was rather overwhelmed by choice, having produced over 200 illustrated features of wood-craft and other creative people, and a similar number broadly based on plants and gardens, businesses and travel. With much of my available picture stock being film-based, I faced a daunting amount of film and print scanning in order to produce uploadable digital files. By the time I reached that conclusion, the count-down had begun. Having received a birthday gift to fund my first photo book, I followed a more experienced colleague’s advice, I bought ‘credit’ at a much reduced price. It pays to wait until offers are made at slack times. Buying credit allows you to purchase a book for completion within an agreed time limit.
So, with the clock already ticking and my first plan shelved, there was an urgent need for a focused mind.
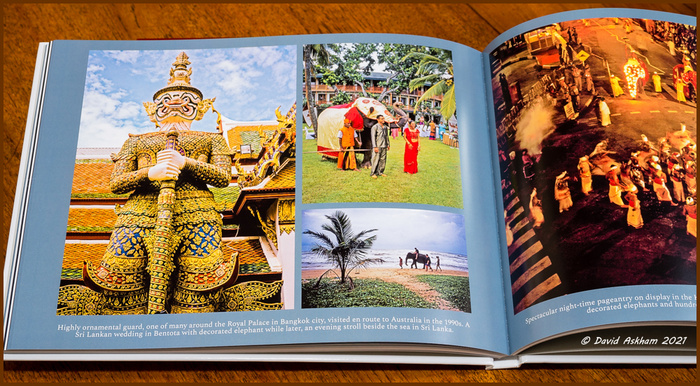
A glimpse into the Travel chapter featuring Bangkok and Sri Lanka. (Pictures scanned from film, shot in the 1990s and later)
A Lightbulb Moment
It was during this period of uncertainty, when my ambitious project had frustratingly turned ‘pear-shaped’, that fortune played its hand, and I experienced my ‘lightbulb’ moment. During lockdown, I learned about the educational value of webinars. That is another topic. However, several of these webinars were sponsored by the RPS (Royal Photographic Society). As a member of the specialist Digital Imaging Group, I was alerted to forthcoming online events. (Non-members of the society were also welcomed after payment of a very small fee). Speakers from worldwide represented many disciplines and genres. One such webinar featured Brooks Jensen, an American fine-art photographer and publisher of a highly regarded journal called Lenswork. His topic for the RPS webinar was: ‘Those Who Inspire Me (and Why)’ and his presentation reached several hundred viewers worldwide. The famous American author Ernest Hemingway was one of his choices.
Ernest Hemingway had a knack for succinct storytelling. Allegedly challenged to tell a story in six words, this is what he created: “For Sale. Child’s shoes. Never worn”. These six words were very sad and soberly thought-provoking.
Brooks Jensen used this unconfirmed story to illustrate how an idea was born for his journal. He cleverly adapted this minimal formula and launched a request for readers to contribute sets of six pictures which told a story (Seeing in Sixes). It was just the idea I needed, to kick-start my tardy photo book project.
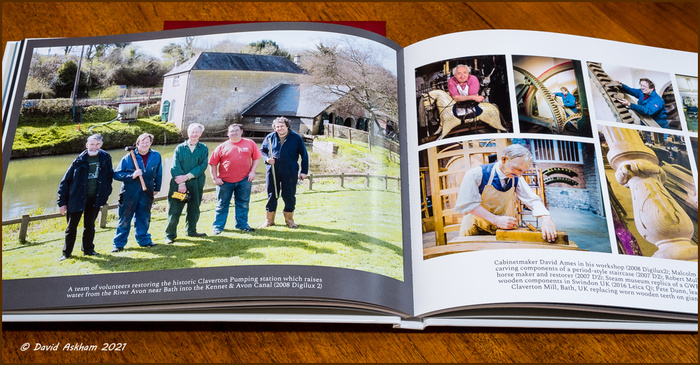
Restoration projects are represented by a team of volunteers at the historic Claverton pumping station near Bath, UK (Main picture - Leica Digilux 2 in 2008)
A New Beginning
With a new presentational formula in mind, I decided to assemble groups of pictures which told a story, or embodied a theme, in two to four pages each. In several cases, such constraint called for very strict editing. Auto-biographical themes emerged and, eventually, selected memories were presented in seven chapters, viz. Family; Homes & Gardens; Pets; Projects; Travel; Steam; and Humour. As the book was intended primarily for family members, in three generations, this breakdown provided plenty of interest and amusement. On another day, I might have settled for a different grouping, such is the diversity of my picture catalogue. Fortunately, I was able to extend my credit for a token fee, which was acceptable for a first major book project.
Judging by the reception to the copies produced and presented as gifts, it has been highly successful and will serve as a valuable family reference book in the future. So what lessons did I learn in compiling my first photo book?
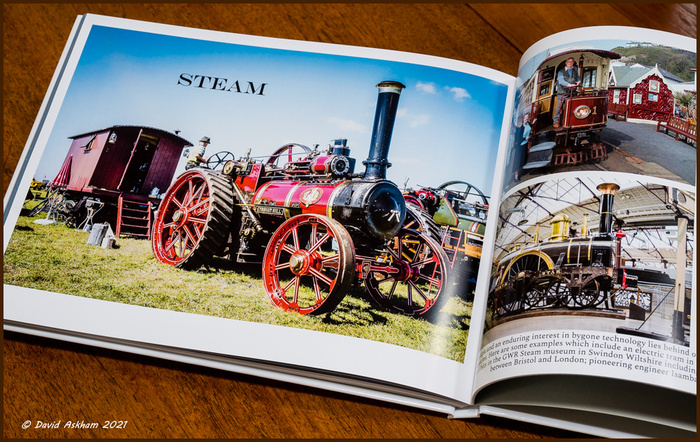
The start of the chapter featuring STEAM subjects (Leica X Vario - 2016)
The Process
Based on the experiences of family and friends, I chose Photobox as my supplier. I purchased an A4 standard landscape book with up to 100 pages. Initial prices appear monstrously high; but I waited until one of several generous offers were made. Patience was rewarded if you allow sufficient time for your project.
Pictures were selected, processed and uploaded to Photobox. I used Lightroom to assemble my selected pictures in seven named ‘collections’, plus one for covers and end-papers. There they resided until they were allocated to blank pages.
Pre-planning saves a lot of time. I used a series of flat-plans in a blank note-book to sketch my initial allocations of pictures. Your Photobox account shows work in progress, starting with empty pages. Photobox offers a quick and easy way of decanting pictures from smart-phones and automatically allocating pictures to pages. However, that was not what I wanted. I uploaded pictures, chapter by chapter, so that each could be designed in turn. In Lightroom, I allocated a titled collection for each chapter. (See illustration)
Lightroom screen-shot showing a panel on screen left, (Identitification inside the red rectangle), with a dedicated list of collections of pictures destined for each chapter in the photo book. On the right is shown a selection of pictures in the STEAM collection.
For each pair of facing pages, I tried to allocate a striking picture for one page, while the opposite page carried two, three, four or even up to eight pictures if necessary. Many two-page spreads contained three or four pictures in total, thus giving certain subjects greater emphasis. The smallest pictures tended to be copies of historic prints, which only existed in small sizes. However, those old pictures were of considerable interest to younger generations, who were quick to pick our facial similarities. In all cases, I aimed for pleasing visual impact, a feature quickly picked up by family viewers.
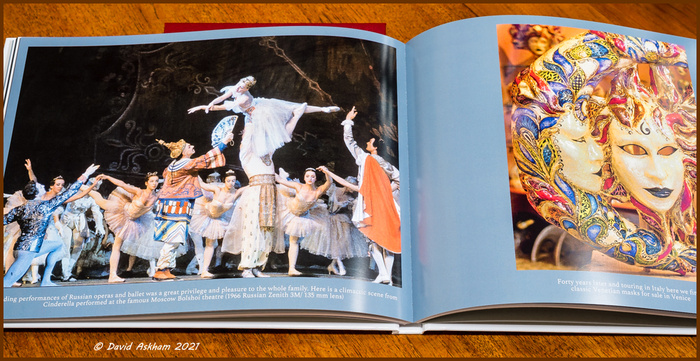
Ballet ‘Cinderella’ performed by the Bolshoi theatre company in Moscow (1960s). (Scanned from film. Russian Zenith 3M camera with 135 mm F/4 lens. 1/30th second exposure High-speed Ektachrome)
The software used by Photobox is simple, but not straight-forward to use. Unfortunately, I felt like a Beta-tester when seeking help, only to find that newer versions of the software did not yet have accurate help in the menu. I found this rather frustrating, and queueing for ‘Chat help’ led to unpredictable dialects and slow interpretation of evolving instructions. Amended ‘help’ was not available online at the time of my compilation.
Although there were several text options, I could not tabulate my ‘Contents’ page. And, despite pages being numbered online, page numbers were not printed, nor could they be printed. So my Content's pagination was a waste of time. The problem was partly overcome by allocating a different page background colour for each chapter. This solution was appreciated by family members when viewing the book.
One excellent feature of the software was its ability to shuffle a selection of pictures until you found an arrangement to your liking. This was huge compensation for my earlier frustration.
Lessons Learned
1. Decide on your subject before you order your book. I had to buy extra credit to compensate for my change of focus.
2. Set up a named picture folder on your computer or a set of Collections in Lightroom, to contain your short-listed picture sets. I find the latter invaluable with all of my projects, because it does not duplicate picture stock. This step saves researching your picture library repeatedly.
3. Make sure your picture files are sufficiently large for your intended publication size.
4. Give some thought to graphics display so that you obtain a good, clear presentation of images and information. If in doubt, aim for simplicity.
5. Draft your captions and other explanatory text before you upload pictures. I did it using a word processor on my desktop computer. Research into historic pictures takes a surprising amount of time. Don’t waste your credit time on this time-consuming chore. (Captions and supporting information are important, so don’t skip this task. Try and anticipate the Who? When? Where? What? and Why? questions which younger readers are bound to ask when you are not around to help them)
6. For your first book, be satisfied with the basic set of pages included in the starting price. One hundred pages was far too ambitious for my kind of project.
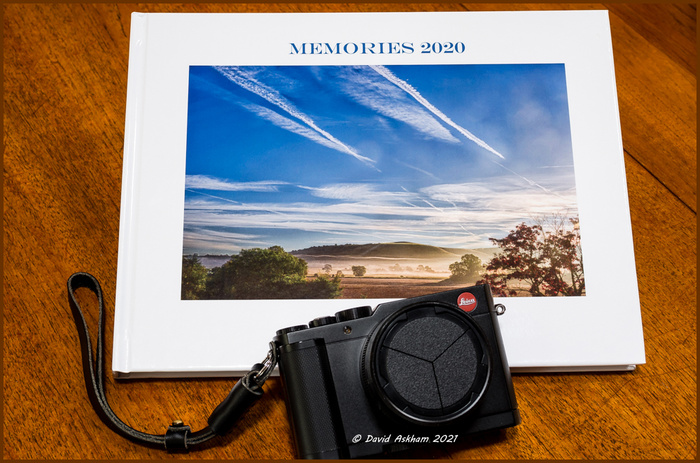
My first photo book ‘Memories 2020' front cover. (Leica X Vario)
Conclusions
While there was a steep learning curve, I was well-pleased with my first photo-book which contained around 265 photographs, many full-page reproductions. While the unit cost was higher than I intended, largely due to over-running preparation time, upgrading paper quality and more pages than an average first book. In the end, I did have a high-quality, full colour, 100 page hard-back book which has been very well-received. and deemed to be a valuable visual and factual autobiographical legacy.
Uncosted are the very many hours of time spent on picture selection and preparation, research, planning, design and writing, all of which was filled with interest and nostalgia.
Pressure is building on me to continue producing some more books. Time will tell!
Please share with me your experiences of producing photo books. One never stops learning.
(All text and photographs are copyright of David Askham 2021 and must not be reproduced without his permission).
Comments
 By Ken Davis: You've guided us very well through the best way of creating a book both from the conceptual and practical viewpoints. By David Askham: Ken, thank you for your encouraging remarks on my latest website article. I also value your early advice given to me when I knew so little about the process. At one extreme, it can be a very simple procedure. Pour smartphone camera pictures into a template and allow algorithms to do the rest is the easy. But you lose all control over the story, assuming there is one. Researching and writing captions and supporting text takes time, but in my view it adds a lot of value to the book. By Pam: Congratulations David A very informative book with wonderful photographs. Maybe we will see it sometime in the future. By David Askham: Thank you, Pam. I really appreciate you taking time to read my article and comment on it. We will find a way, somehow, for you to see the book. By Jayne Booton: I very much enjoyed reading your process David, and from the glimpses of your book it looks a treat for the eye. I greatly admire your patience and effort in putting it together... the idea of different background colours for subjects is one I will borrow if I may, and another will be using Collections in Lightroom to collate images, I always skip using Collections.
I think I've probably done a dozen or so of these books now, a couple for friends covering specific events, first years of grandchildren, places visited etc. I always tend to try to keep pages to around 50 or less.. think I would find 100 too much of a challenge, and I am much lazier than you with the written words only giving the odd bit of information.
I have used Photobox ( Blurb, Apple Books - no longer available), they often have offers as you say, and they also make it possible for you to "Share your creation" online with an e-mail link should you wish to.
I can well imagine how many hours you spent on your book, knowing how many I did on my much smaller volumes. I still have a few unfinished projects sitting on the photobox site that I just can't get round to finishing. My intention being when an offer comes along to finish off and get them printed.
Anyway, congratulations on yours and thanks for sharing your experience which gives me some ideas future efforts.
Best Regards
Jayne B By David: Thank you very much for your kind comments, Jayne. They are greatly appreciated. Without feedback, it is like writing in the dark. Collections is a facility often ignored by photographers, yet it is so useful. Even more useful are Smart collections. By embedding a coded keyword, a smart collection gathers all candidate images as if by magic. Do ask if you need any help to get the best out of Collections. That is the main purpose of my website, to help other photographers. Back to my book, without the pandemic, I doubt it would have been done. There is a steep learning curve if you desire more than a basic display of images. By Alan Humphries: My you have been on an adventure. I note that early on you realised the importance of having a coherent theme. The process of assembling a first book will naturally depend on a degree of trial and error. One thing I am sure your years in writing/publishing will have taught you is the importance of making the images flow.
Like you I found my first book a bit of the challenge, now a few books on, each with a specific theme and including one hardback in monochrome I find the experience absorbing and immensely satisfying.
Well done and keep up the good work. By David Askham: Alan, thank you for your kind words and generous help. Because of Covid-19, the last copy of our book was delivered only yesterday, but it was well-received and much appreciated. By David Cantor: Matt Stuart has written an excellent book entitled 'Think like a street photographer'. While not primarily about creating a photo book, Matt gives some very helpful hints. Like linking photos on opposite pages and the grin principle, start and finish with the strongest images By David Askham: David Cantor, thank you for your comment which I regret missing earlier. Yes, I have Matt Stuart's book and it is excellent. I often dip into it for a quick read.
By Ken Davis: You've guided us very well through the best way of creating a book both from the conceptual and practical viewpoints. By David Askham: Ken, thank you for your encouraging remarks on my latest website article. I also value your early advice given to me when I knew so little about the process. At one extreme, it can be a very simple procedure. Pour smartphone camera pictures into a template and allow algorithms to do the rest is the easy. But you lose all control over the story, assuming there is one. Researching and writing captions and supporting text takes time, but in my view it adds a lot of value to the book. By Pam: Congratulations David A very informative book with wonderful photographs. Maybe we will see it sometime in the future. By David Askham: Thank you, Pam. I really appreciate you taking time to read my article and comment on it. We will find a way, somehow, for you to see the book. By Jayne Booton: I very much enjoyed reading your process David, and from the glimpses of your book it looks a treat for the eye. I greatly admire your patience and effort in putting it together... the idea of different background colours for subjects is one I will borrow if I may, and another will be using Collections in Lightroom to collate images, I always skip using Collections.
I think I've probably done a dozen or so of these books now, a couple for friends covering specific events, first years of grandchildren, places visited etc. I always tend to try to keep pages to around 50 or less.. think I would find 100 too much of a challenge, and I am much lazier than you with the written words only giving the odd bit of information.
I have used Photobox ( Blurb, Apple Books - no longer available), they often have offers as you say, and they also make it possible for you to "Share your creation" online with an e-mail link should you wish to.
I can well imagine how many hours you spent on your book, knowing how many I did on my much smaller volumes. I still have a few unfinished projects sitting on the photobox site that I just can't get round to finishing. My intention being when an offer comes along to finish off and get them printed.
Anyway, congratulations on yours and thanks for sharing your experience which gives me some ideas future efforts.
Best Regards
Jayne B By David: Thank you very much for your kind comments, Jayne. They are greatly appreciated. Without feedback, it is like writing in the dark. Collections is a facility often ignored by photographers, yet it is so useful. Even more useful are Smart collections. By embedding a coded keyword, a smart collection gathers all candidate images as if by magic. Do ask if you need any help to get the best out of Collections. That is the main purpose of my website, to help other photographers. Back to my book, without the pandemic, I doubt it would have been done. There is a steep learning curve if you desire more than a basic display of images. By Alan Humphries: My you have been on an adventure. I note that early on you realised the importance of having a coherent theme. The process of assembling a first book will naturally depend on a degree of trial and error. One thing I am sure your years in writing/publishing will have taught you is the importance of making the images flow.
Like you I found my first book a bit of the challenge, now a few books on, each with a specific theme and including one hardback in monochrome I find the experience absorbing and immensely satisfying.
Well done and keep up the good work. By David Askham: Alan, thank you for your kind words and generous help. Because of Covid-19, the last copy of our book was delivered only yesterday, but it was well-received and much appreciated. By David Cantor: Matt Stuart has written an excellent book entitled 'Think like a street photographer'. While not primarily about creating a photo book, Matt gives some very helpful hints. Like linking photos on opposite pages and the grin principle, start and finish with the strongest images By David Askham: David Cantor, thank you for your comment which I regret missing earlier. Yes, I have Matt Stuart's book and it is excellent. I often dip into it for a quick read.