History Aiding Digital Photography (2021)
08th August 2021
History is one of those subjects which you either love, or loath. You enjoy reading and searching for historical facts, or it fails to ignite your interest. Although I am not an historian, there are many aspects of the subject which I find invaluable and interesting. It certainly helps with interpreting current events by learning from the past. Surprisingly, history can also help with digital photography, which is why I am discussing how this seemingly unlikely ally, can be a help in making the most of our digital assets.
I have used Lightroom since it was first launched. My digital processing is mostly carried out in Lightroom, and version 6 (LR6), which I currently run on a Windows PC, covers all of my needs. Over many years, I have gained confidence in mastering its capabilities. Incremental upgrades have introduced powerful new tools and procedures. Consequently, I am continually learning new techniques and gaining experience, with beneficial results. These vastly surpass my early attempts in digital photography.
As a novice, I made many mistakes although, at the time, I didn’t always realize it. I was just amazed by what could be done, on a computer. Cameras, firmware and processing software continually improve. One benefit of such progress is that my earliest digital images can now be revisited and, in many cases, reprocessed and improved. And so we come to the part history plays.
Examples
Is it possible to tap into historical actions, where I possibly took the wrong turning? Well, it is, so long as those former actions have been saved with the files. Let us look at some examples, starting with a screenshot of a typical historical record, so you can become familiar with its appearance and content. The following four pictures are from my old Leica Digilux 2 archives.
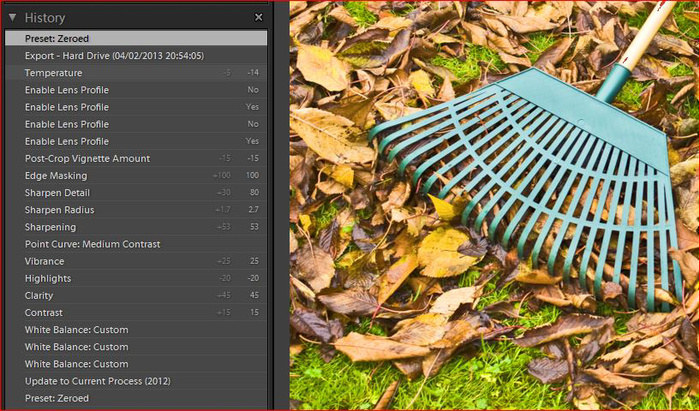
This screenshot shows the History panel in Lightroom Develop module. Note that I chose to zero the operations, using a preset, in order to nullify old adjustments and start afresh. The foregoing history showed a confused approach to processing the picture. A fresh start was needed.
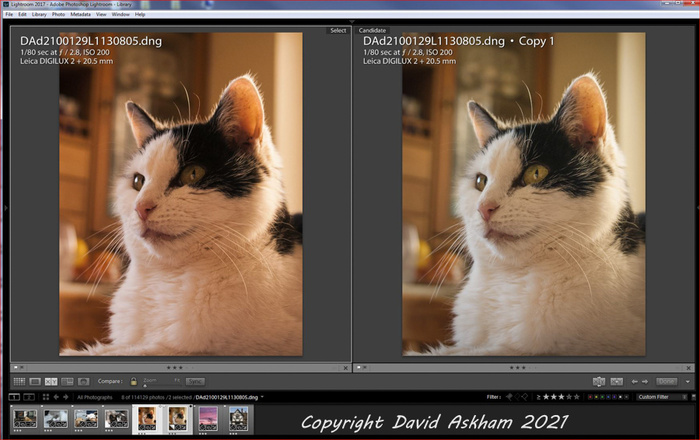
Penny was an inherited mid-life cat who quickly loved living with us. The picture shown here is a screenshot showing the image as processed in 2010 (left) and after recent processing in 2021. Eleven years ago, I possessed only a rudimentary understanding of White Balance. The History column shows that I relied on the automatic setting, which many people do. It consistently produces good results, except in cases where light is unpredictable or mixed, such as indoors, with subjects often picking up colours of walls or furniture adding a warmer tone to the picture. Or daylight mixing with tungsten lighting indoors. There is nothing wrong with this approach. However, with time, I learned more about adjusting white balance, either in camera or in post-processing. The second version shows the result of sampling a clean white in the picture, giving a purer version of the colour of Penny’s coat. Nowadays, I use a calibrated grey card at the time of shooting.

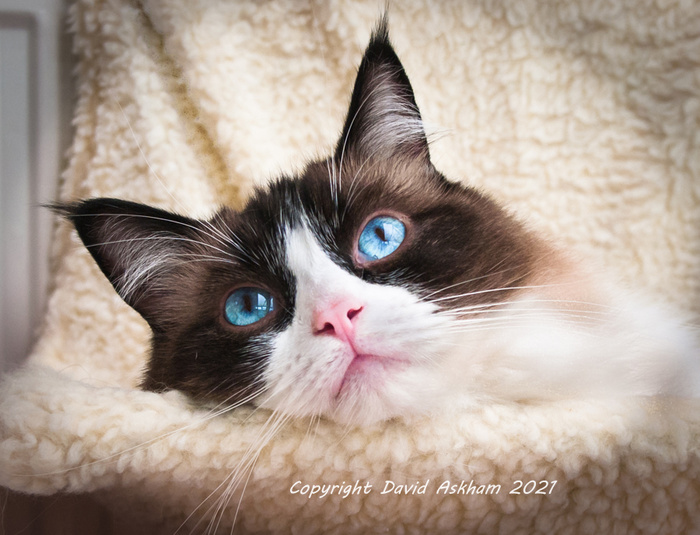
Here is another comparison shot showing the cropped original, taken in 2009, and on the right, after a few light tweaks in Lightroom. First, I adjusted the crop just a little more (bear in mind this is from only a 5 MP file). Next, I used a brush to improve her eyes and neck fur, and to soften an ugly dark crease in the background. Finally, I added an elliptical vignette to focus attention on her face. I am more satisfied with the second version, which bears scrutiny, despite its small file size in comparison with modern sensors. (See the first picture in the article)
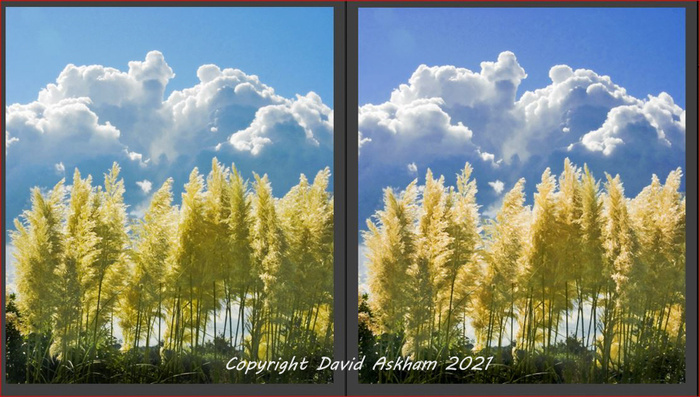
Another Digilux 2 picture was taken in 2006. With film photography, colours might change over time and there is little to remedy it unless the picture is digitized. In this case, I fear I was not too careful and allowed automatic white balance to hold sway. Today, I am confident that I can restore a more truthful hue to the sky, adding new dominance to the cumulonimbus clouds. Also, I can improve the straw colour in the pampas plumes. Unless you see the two versions, side-by-side, each would be acceptable in its own right.
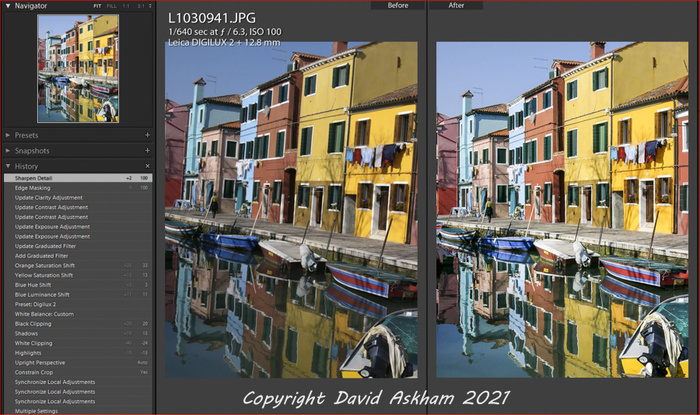
This picture of a picturesque island village on the Venetian Lagoon was taken with a Digilux 2 in 2006. The history panel shows that some adjustments were made long ago, but interest waned. I think at the time, I was unsure how to address leaning buildings. Not only have I learned those skills, to a certain extent, but I have used an angled linear mask to lighten the reflections at the base of the picture. White balance has been tweaked and HSE (Hue Saturation Exposure), to improve the painted houses. Before and after shots reveal the drastic improvements to a picture originally shot as a Jpeg. (I didn’t understand Raw in those early days). However, I must have been jostled as I took the picture because my framing is usually much better than that.
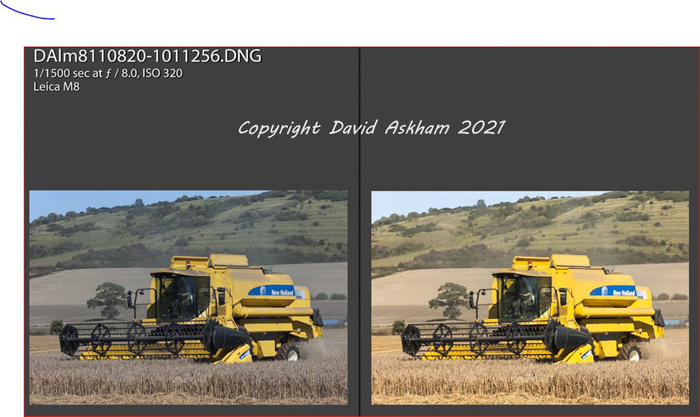
A Leica M8 picture showing a combined harvester at work in my village. The History panel showed that only three automated actions had been recorded, and the file was left. Ten years later and new techniques brought about an improvement in exposure, colour and white balance. Selective brush work on the dark interior of the cabin also revealed a little detail. The result is a worthy capture by a very good camera and has potential value as a stock picture, despite its native size.
Modern photography
I have shown examples of processing changes, based on improved skills acquired over a decade or more. Nowadays, errors are less frequent and rarely pass unnoticed. However, occasionally it does happen, usually when I turn to Photoshop for features not available in Lightroom, such as layers. Errors can pass unseen if you rely on judging quality at less than 100 %. To reach the highest standards, images must be examined at 100%, at least. At this magnification, small errors in brushwork and cloning will be more apparent than if viewed at fill-screen sizes, and can be corrected.
One time I was puzzled by some unwanted artefacts in a picture, right at the end of a processing session. The picture just did not reach my required standards; so back to Lightroom for further investigation. Thankfully, an examination of the entire history gave me a clue to the cause. I discovered it by working backwards, one step at a time, in the History panel. Suddenly, the artefacts disappeared, and I knew how I could repair my error, step by step, until it was satisfactory. Sadly, I did not keep a snapshot or virtual copy of the processing stages, so I am unable to share the experience with you, visually. Take my word for it; familiarize yourself with the History panel. It might help you save a precious picture.
Occasionally, I revisit a colour picture in order to produce a monochrome or split-tone alternative. In those instances, I examine the History record and select a stage in my past processing which would suit my new purpose, and then make a virtual copy which becomes a new derivative file. That new version will start with its own historical record of the steps taken to produce the new picture. It will not have the history relating to its earlier life. That remains with the original file.
Conclusions
Knowledge of the History panel is a valuable tool in solving exposure or processing problems, or permitting new picture versions to be created. You might find the History panel is minimized; if so, just click on the title to see its contents.
If you have discovered other uses for the History panel, please share them with other readers, by entering a comment to the article. Thank you for your interest in my website articles.
I have used Lightroom since it was first launched. My digital processing is mostly carried out in Lightroom, and version 6 (LR6), which I currently run on a Windows PC, covers all of my needs. Over many years, I have gained confidence in mastering its capabilities. Incremental upgrades have introduced powerful new tools and procedures. Consequently, I am continually learning new techniques and gaining experience, with beneficial results. These vastly surpass my early attempts in digital photography.
As a novice, I made many mistakes although, at the time, I didn’t always realize it. I was just amazed by what could be done, on a computer. Cameras, firmware and processing software continually improve. One benefit of such progress is that my earliest digital images can now be revisited and, in many cases, reprocessed and improved. And so we come to the part history plays.
(A strikingly improved portrait of a young Ragdoll cat will certainly find itself in a new photo book, or possibly as a wall picture. Not bad for a cropped 5 Megapixel picture produced by a camera now 17 years old! (Digilux 2))
--==((()))==--
Examples
Is it possible to tap into historical actions, where I possibly took the wrong turning? Well, it is, so long as those former actions have been saved with the files. Let us look at some examples, starting with a screenshot of a typical historical record, so you can become familiar with its appearance and content. The following four pictures are from my old Leica Digilux 2 archives.
(Screen segment showing the History panel in Lightroom with a fragment of associated image)
This screenshot shows the History panel in Lightroom Develop module. Note that I chose to zero the operations, using a preset, in order to nullify old adjustments and start afresh. The foregoing history showed a confused approach to processing the picture. A fresh start was needed.
--==((()))==--
(Penny captured in mixed lighting indoors, showing processing results eleven years apart)
Penny was an inherited mid-life cat who quickly loved living with us. The picture shown here is a screenshot showing the image as processed in 2010 (left) and after recent processing in 2021. Eleven years ago, I possessed only a rudimentary understanding of White Balance. The History column shows that I relied on the automatic setting, which many people do. It consistently produces good results, except in cases where light is unpredictable or mixed, such as indoors, with subjects often picking up colours of walls or furniture adding a warmer tone to the picture. Or daylight mixing with tungsten lighting indoors. There is nothing wrong with this approach. However, with time, I learned more about adjusting white balance, either in camera or in post-processing. The second version shows the result of sampling a clean white in the picture, giving a purer version of the colour of Penny’s coat. Nowadays, I use a calibrated grey card at the time of shooting.
--==((()))==--
(Lucy showing respective processing achievements, twelve years apart)
Here is another comparison shot showing the cropped original, taken in 2009, and on the right, after a few light tweaks in Lightroom. First, I adjusted the crop just a little more (bear in mind this is from only a 5 MP file). Next, I used a brush to improve her eyes and neck fur, and to soften an ugly dark crease in the background. Finally, I added an elliptical vignette to focus attention on her face. I am more satisfied with the second version, which bears scrutiny, despite its small file size in comparison with modern sensors. (See the first picture in the article)
--==((()))==--
(Pampas grass and threatening clouds. On a calibrated monitor, the more accurate blue sky and straw-coloured plumes should be discernible)
Another Digilux 2 picture was taken in 2006. With film photography, colours might change over time and there is little to remedy it unless the picture is digitized. In this case, I fear I was not too careful and allowed automatic white balance to hold sway. Today, I am confident that I can restore a more truthful hue to the sky, adding new dominance to the cumulonimbus clouds. Also, I can improve the straw colour in the pampas plumes. Unless you see the two versions, side-by-side, each would be acceptable in its own right.
--==((()))==--
(Burano in the Veneto, Italy. A mistake in capture left this image of a pretty waterside village unused. However, skills acquired later enabled a pleasing corrected result to be produced)
This picture of a picturesque island village on the Venetian Lagoon was taken with a Digilux 2 in 2006. The history panel shows that some adjustments were made long ago, but interest waned. I think at the time, I was unsure how to address leaning buildings. Not only have I learned those skills, to a certain extent, but I have used an angled linear mask to lighten the reflections at the base of the picture. White balance has been tweaked and HSE (Hue Saturation Exposure), to improve the painted houses. Before and after shots reveal the drastic improvements to a picture originally shot as a Jpeg. (I didn’t understand Raw in those early days). However, I must have been jostled as I took the picture because my framing is usually much better than that.
--==((()))==--
A Leica M8 picture showing a combined harvester at work in my village. The History panel showed that only three automated actions had been recorded, and the file was left. Ten years later and new techniques brought about an improvement in exposure, colour and white balance. Selective brush work on the dark interior of the cabin also revealed a little detail. The result is a worthy capture by a very good camera and has potential value as a stock picture, despite its native size.
--==((()))==--
Modern photography
I have shown examples of processing changes, based on improved skills acquired over a decade or more. Nowadays, errors are less frequent and rarely pass unnoticed. However, occasionally it does happen, usually when I turn to Photoshop for features not available in Lightroom, such as layers. Errors can pass unseen if you rely on judging quality at less than 100 %. To reach the highest standards, images must be examined at 100%, at least. At this magnification, small errors in brushwork and cloning will be more apparent than if viewed at fill-screen sizes, and can be corrected.
One time I was puzzled by some unwanted artefacts in a picture, right at the end of a processing session. The picture just did not reach my required standards; so back to Lightroom for further investigation. Thankfully, an examination of the entire history gave me a clue to the cause. I discovered it by working backwards, one step at a time, in the History panel. Suddenly, the artefacts disappeared, and I knew how I could repair my error, step by step, until it was satisfactory. Sadly, I did not keep a snapshot or virtual copy of the processing stages, so I am unable to share the experience with you, visually. Take my word for it; familiarize yourself with the History panel. It might help you save a precious picture.
Occasionally, I revisit a colour picture in order to produce a monochrome or split-tone alternative. In those instances, I examine the History record and select a stage in my past processing which would suit my new purpose, and then make a virtual copy which becomes a new derivative file. That new version will start with its own historical record of the steps taken to produce the new picture. It will not have the history relating to its earlier life. That remains with the original file.
Conclusions
Knowledge of the History panel is a valuable tool in solving exposure or processing problems, or permitting new picture versions to be created. You might find the History panel is minimized; if so, just click on the title to see its contents.
If you have discovered other uses for the History panel, please share them with other readers, by entering a comment to the article. Thank you for your interest in my website articles.
(Copyright © David Askham 2021)
Comments
 By Pam: I love your cat. She is so beautiful with her blue eyes. The other photos are great too and even one of Venice for me.
Thank you very much. They are what memories are made of.
Pam By David Askham: Thank you very much, Pam. Revisiting older photographs can be very rewarding. And yes. Blue eyes are irresistible. By Cled: The transformation now available ion the modern programmes is vey impressive. The improvement in the pampas grass image is very subtle but beautiful but that of the combine harvester is striking and transforms the picture completely. I have revisited some of my pictures and benefited from the software updates. Well worth persuing. Thank you David. By David: It is very pleasing to read your comments, Cled. It is rewarding revisiting older pictures and challenging oneself to make worthwhile improvements. Thank you for sparing time to comment.
By Pam: I love your cat. She is so beautiful with her blue eyes. The other photos are great too and even one of Venice for me.
Thank you very much. They are what memories are made of.
Pam By David Askham: Thank you very much, Pam. Revisiting older photographs can be very rewarding. And yes. Blue eyes are irresistible. By Cled: The transformation now available ion the modern programmes is vey impressive. The improvement in the pampas grass image is very subtle but beautiful but that of the combine harvester is striking and transforms the picture completely. I have revisited some of my pictures and benefited from the software updates. Well worth persuing. Thank you David. By David: It is very pleasing to read your comments, Cled. It is rewarding revisiting older pictures and challenging oneself to make worthwhile improvements. Thank you for sparing time to comment.